InVideo AI - Image Creation Testing
1: Getting started
I started on the homepage, where the main Start Creating button sat in the middle of the page, with a Sign up button in the top right. Either one moved me toward making an account, so there wasn't much guesswork about where to begin. One thing I noticed right away was that both buttons funneled to the exact same place, so there was no wrong door to pick, though it also meant my very first action was being nudged toward signing up rather than trying anything out.
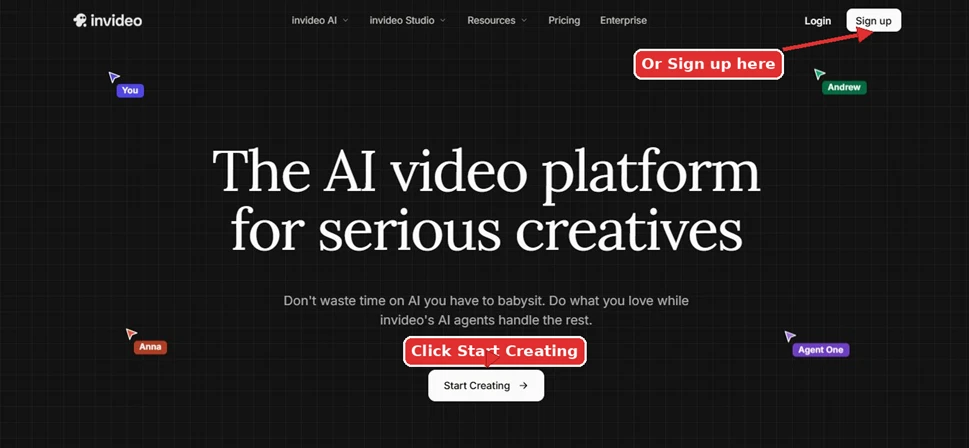
Image 1: The homepage. Click Start Creating, or use Sign up in the top right.
2: Signing up
To use the tool I needed an account. I could sign up with my email by typing it in and clicking Continue, or take the faster route with Continue with Google or Continue with Apple. There was also a Log in option for anyone who already had an account. What stood out to me here was how much the Google and Apple options sped things up. I was through in a few seconds rather than typing an address and waiting on a verification step.
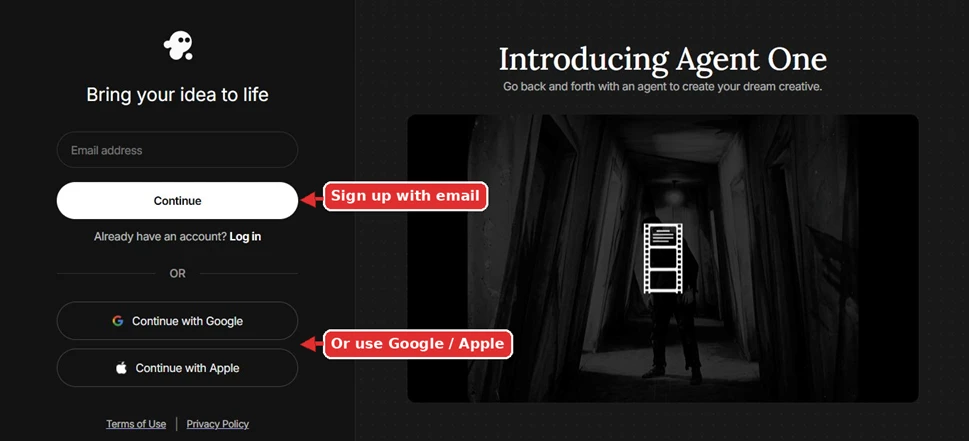
Image 2: The sign up screen. Use your email, or sign up faster with Google or Apple.
3: Entering the prompt
After signing in I landed on the console. At the top I could choose Agent mode, which is a guided chat, or Autopilot. I typed my idea into the large box and clicked the send button, the up arrow on the bottom right. Below the box sat a row of quick starting points like Product Ads and Create AI shorts, there for anyone who would rather start from a template. This is the prompt I used:
An Indian Girl in Golden Hour in traditional Dress
I'll note that the send button took me a moment to find, since it is just a small up arrow tucked into the corner of the box, and I was glad the template row sat right below in case I wanted a ready-made shortcut instead of writing my own prompt.
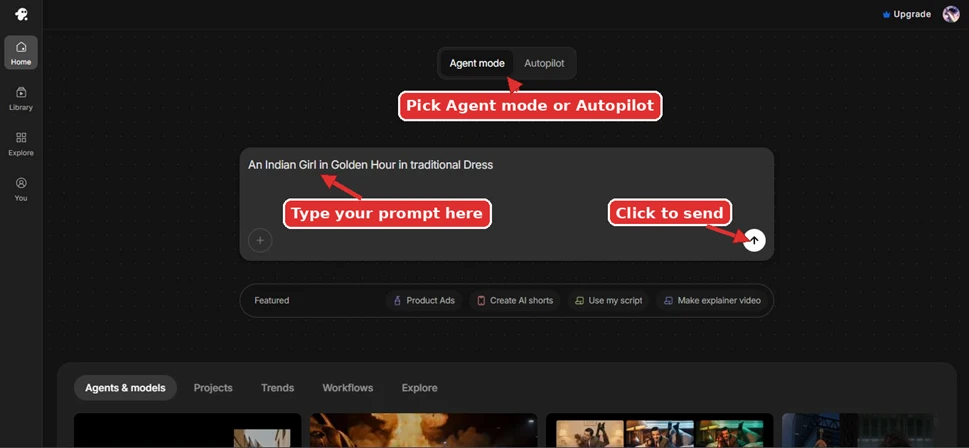
Image 3: The console. Pick a mode, type your prompt, then click the send button.
4: Answering the agent's questions
The agent, named Sara here, replied in a chat and asked questions to refine my idea. It asked whether I wanted a cinematic video or a hero still, and I went with a hero still. I kept the conversation going by typing in the message box at the bottom, and while we chatted the right panel showed the workspace where my output was being built, with a note that it was processing. What I noticed most was that this added a step before any output appeared, so it felt more like a conversation than an instant generator, and the processing note on the right was the main thing keeping me oriented while I waited.
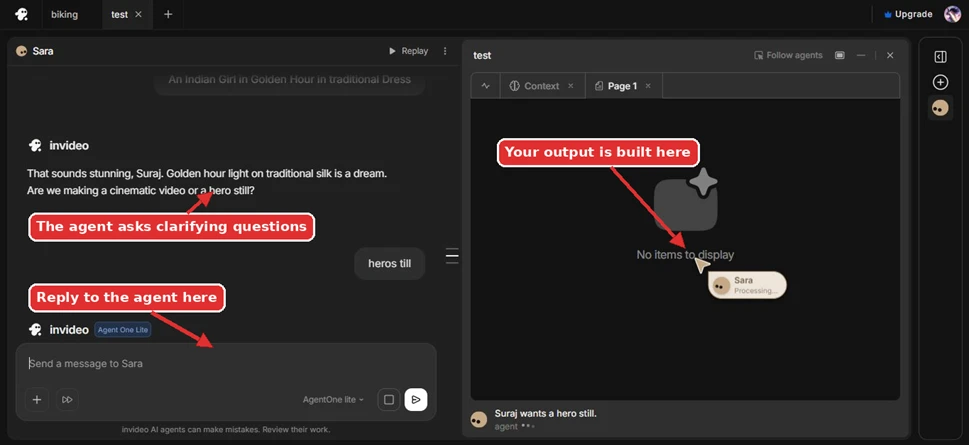
Image 4: The agent chat. Sara asks clarifying questions, you reply, and the output is built on the right.
5: Reviewing and downloading
When the image was ready it opened in a preview. The right side showed the full prompt the agent had written from my short idea, along with the settings it used: the model (Nano Banana 2), the aspect ratio (Horizontal 16:9), and the resolution. From the list of actions I could mark the image approved or rejected, select and edit it, delete it, or click Download to save it. I downloaded the final result from there. The part that stood out to me was seeing the full expanded prompt sitting next to my short idea, since it showed me exactly how the agent had read my request, and the approve, reject, and edit actions made this feel like a proper review step rather than a take-it-or-leave-it result
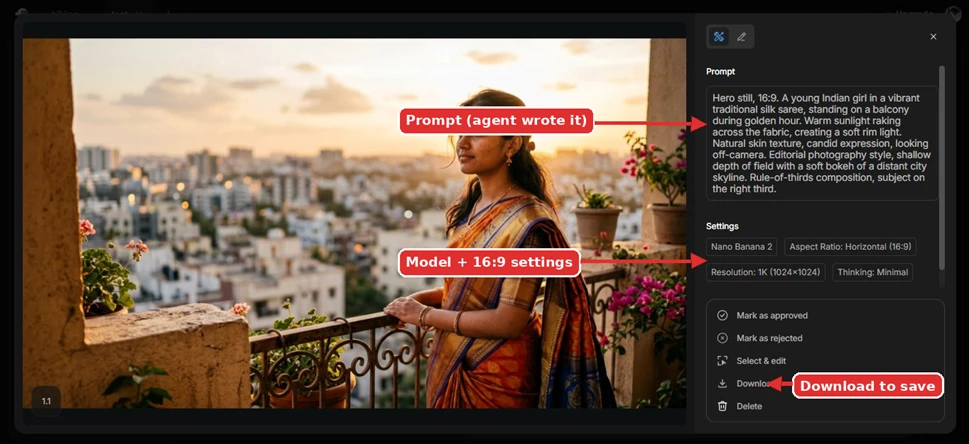
Image 5: The output preview. Check the prompt and settings, then click Download to save the image.
This is the image it produced:

Image 6: The downloaded result.
What won me over
- The entry point was clear: both Start Creating and Sign up led to the same place, so I always knew where to begin.
- Sign-in was quick, with the option to use email or skip ahead using Google or Apple.
- There were two modes to suit how much control I wanted: Agent mode for a guided chat, or Autopilot for a more hands-off run.
- The template shortcuts (Product Ads, Create AI shorts) gave ready-made starting points if I didn't want to begin from scratch.
- The agent actively refined my vague idea. Sara's clarifying question about a cinematic video versus a hero still helped shape the result rather than leaving it to guesswork.
- It was flexible despite being video-first, since the agent could still produce a single image, called a hero still.
- The output was transparent and controllable: the preview showed the full prompt and settings, and I could approve, reject, edit, delete, or download.
What gave me pause
- An account is required up front. There's no trying it before signing up, since both buttons lead straight to account creation.
- It took more steps than a one-shot generator. I had to sign in, pick a mode, prompt, then answer the agent's questions before anything got built, which is a lot of back-and-forth to reach a single image.
- Image generation feels like a side use. Making a still works, but the tool is really built around video, so an image is a secondary path rather than the main event.
- The setup was decided for me. The agent chose the model, aspect ratio, and resolution from my short idea, which is fine for speed but leaves the choices in its hands, even though I could edit afterward.